
The Pile
A few weeks ago my lovely step-daughter moved to Denver with her boyfriend. Great to see her grow up, but I feel really conflicted about having her so far away. Anywhere I have to get on a plane to go to is far away. They piled a ton of stuff into 2 cars and off they went. In her wake, she left some t-shirts that have meant a lot to her, and she just couldn’t see giving them to the thrift store or throwing them out. Dedicated step-mom that I am, I said, “Keep them. I can turn them into a quilt for you. One, two, three.” I’d made one for a friend a few years ago and there was nothing to it.
Of course, the quilt I made for my friend had all the squares the same size.

For Rica
A little fusible interfacing. Some sashing. And bang, it was done. Not so with the shirts that M— saved. They ranged from about 4 inches square to almost – no all of – the entire front of a shirt. I should’ve taken a picture of the pile of shirts before I got going on the ironing, but I was so excited to do something I was sure was only going to take me a few weeks that I just dove right in.
The first thing you should know if you are going to make a t-shirt quilt is that the squares should be as close to the same size as possible. You can always add a little sashing on the siders to bring them all up to the same size. If you look at the quilt I made for Rica, you can see white sashing on one and pink sashing on two. The other thing you should know is that you need to put a lightweight fusible interfacing on the back of every single shirt BEFORE you cut it. This is super important. If you don’t, it will stretch and there is no way you will get a nice flat top.
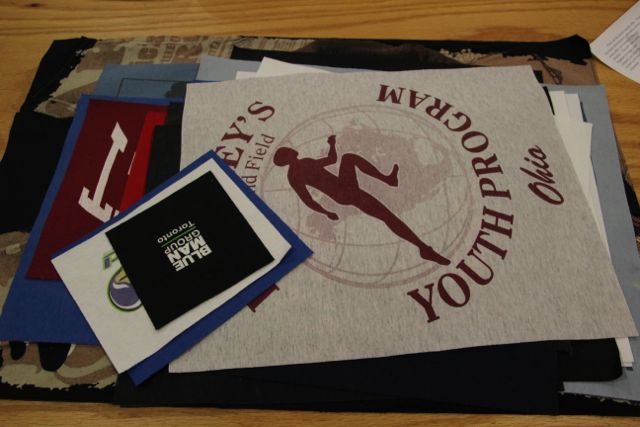
I bought a small bolt of interfacing, cut the fronts off all the shirts and set about figuring out where to cut them. I wanted to make sure I had enough interfacing to do all of them, twenty-five, yup you heard me, so I decided to leave 1 inch around the designs, and I cut the interfacing to fit that. The picture at the top is all the cut sections. Did I measure anything on the outside edge? Nope. In fact, with the way I chose to put this thing together, I still haven’t actually measured them. It will all become clear.
The tough part was deciding how to arrange the sections, and how to do the math. Yes folks. Quilting involves a lot of math. Sometimes you can get a book to do it for you, and sometimes you can just skirt around it. I wanted to just have little cutouts of each shirt so I could push them around on my big piece o’ graph paper. But I didn’t really want to just measure everything, because then I wouldn’t be able to see the colors. D— to the rescue! I put a stationary object on my design wall. In this case, an old soap label that I didn’t care about wasting. And then I took a picture of each shirt under it.


With his magic graphic design Photoshop skills, he scaled each image to match the stationary label at the top. We printed them all, cut them out and had an almost perfect replica of all the sections only at a 1/4″ = 1″ scale. Now I could push them around to decide where they would fit the best.


-

- The whole darn thing
It was like putting together a puzzle without knowing what the finished picture was supposed to look like. Now the only partial math part of putting in all the sashing steps in. We’ll save that for part two. There’s still only a little math involved. Incredible as it seems. Or seams. Get it? Hmmm. I’ve worked on it too much today.
Very clever. Takes two to tango or to make a t-shirt quilt…
Math Mom
Pingback: Trip Around the World Quilt | The Debby Project
Pingback: The Guest Room – part 3 | The Debby Project